A Step-by-Step Method for Decorating an Artificial Christmas Tree Properly

Most people decorate a tree by instinct: lights on, baubles on, stand back, adjust. It works, but it rarely produces the result they had in mind, and it almost always takes longer than it needs to.
Professional display dressers work to a sequence. It is not complicated, and once you have done it once it becomes the only way you will want to do it. Here is the method, step by step.
Step One: Choose and Assemble the Tree
Everything downstream depends on the tree itself, so start by being realistic about what you are working with.
Measure your ceiling and subtract 30cm for stand and topper. Check the base width against your floor space. Then look at the tip count in the specification, because that number tells you more about how full the tree will look than any photograph does.
If you are buying new, it is worth comparing artificial Christmas trees in a few different heights, widths and tip densities before committing, since a tree with 700 tips and one with 1,300 will need completely different amounts of decoration to look finished.
Assemble the tree, then leave it for a few hours if you can. Branches compressed in a box need time to relax before you shape them.
Step Two: Fluff Every Branch
This is the step everyone skips and the one that makes the biggest difference.
Start at the bottom section and work upwards, and on each branch work from the trunk outwards. Separate every tip so it is not sitting flat against its neighbour, and bend them in different directions: some up, some down, some sideways. You are trying to break up the uniform plane the branches were packed in.
On a 7ft tree this takes around twenty minutes. Put the radio on. It is genuinely the difference between a tree that reads as artificial and one that does not.
Step Three: Check the Lights Before They Go Near the Tree
Lay every set out on the floor and plug it in before you start wrapping. Finding a dead section after it is woven into the tree is a special kind of frustration.
While they are out, inspect the cables properly. Look for cracked or brittle insulation, exposed wire near the plug, scorch marks, or a bulb socket that has gone brown. Anything damaged gets replaced, not repaired with tape. Electrical Safety First’s guidance on decorative lighting sets out what to check and what to throw away, and it is a five-minute read that is worth doing once properly.
Work out how many lights you need: 100 bulbs per foot of tree height is the usual minimum, so a 7ft tree wants at least 700, and more if you want it to glow rather than twinkle.
Step Four: Wrap the Lights, Do Not Drape Them
Draping lights around the outside of a tree is quick and looks it.
Instead, start at the bottom near the trunk with the plug end accessible, and work up in sections. On each branch, run the string from the trunk out to the tip, loop around, and come back in towards the trunk before moving to the next branch. Then move up.
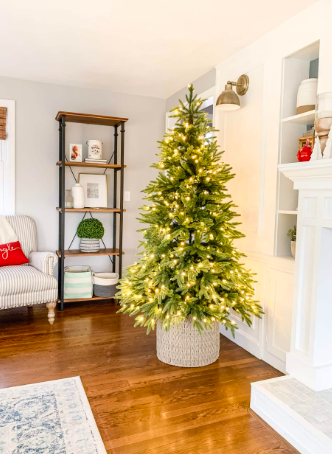
This puts light deep inside the tree as well as on the surface, which creates depth and shadow. It takes longer. It also looks dramatically better, and it is the single biggest difference between a shop display tree and a home one.
Step Five: Ribbon or Garland Next
If you are using ribbon, it goes on before ornaments, not after.
Work from the top down in a loose spiral, tucking the ribbon into the tree every so often so it disappears behind branches and re-emerges. Ribbon that sits on the surface looks like it has been wrapped around a parcel. Ribbon that weaves in and out looks like it grew there.
Wired ribbon holds its shape and is much easier to work with than unwired. Cut lengths of two or three metres rather than trying to manage the whole roll.
Step Six: Largest Ornaments First, Placed Deep
Start with your biggest baubles and push them well into the tree, close to the trunk, rather than hanging them on the outer tips.
This is counterintuitive and it is what creates dimension. Large ornaments sitting deep catch the internal lighting and create shadow behind the outer branches. Large ornaments on the outside just look heavy.
Distribute them in a rough spiral down the tree rather than in horizontal bands, and step back every few to check you have not clustered them all on one side, which everyone does.
Step Seven: Medium, Then Small
Medium ornaments go on the middle third of each branch. Small ones go on the outer tips, where they catch the light and give the silhouette some sparkle.
Group in odd numbers. Threes and fives read as deliberate; pairs and fours read as filler. And resist filling every gap, because negative space is what lets the individual pieces register.
Step Eight: Topper, Skirt and Final Check
Topper last, and check the weight before you commit: a heavy topper on a slim tree is a stability problem waiting for someone to walk past it.
Cover the stand with a skirt, collar or basket, and tidy the cables. A trailing extension lead undoes a great deal of careful work.
Then turn off every other light in the room, switch the tree on, and look at it from the doorway, which is where everyone will see it from. Any gaps or clusters will be immediately obvious, and five minutes of adjustment at this point is worth an hour of fiddling earlier.
Common Mistakes and How to Correct Them
If the tree looks thin, the usual cause is not too few decorations but insufficient fluffing, or too few lights. Both are fixable without buying anything.
If it looks cluttered, you have probably used too many ornaments of a similar size. Remove about a fifth, starting with the medium ones, and the remaining pieces will read more clearly.
If it looks lopsided, you have almost certainly decorated the side facing you and neglected the back. Rotate the tree halfway through, or at minimum walk around it before you finish.
If the colours look muddy, the palette is too wide. Three colours plus one metallic is the reliable formula, and anything beyond that needs a confident eye to pull off.
If You Are Working to a Theme
A theme is simply a palette plus a texture, and it is easier to execute than it sounds. Decide on three colours and one metallic before you buy anything, then apply the same rule to ribbon, picks and topper as you do to baubles.
The usual failure is buying the theme in stages across several Novembers, which produces four slightly different versions of the same gold. Buy the core of a scheme in one go, then add to it in later years only in colours you can match.
See also: Top Delhi Travel Attractions Tourists Love
Packing Away
The method has one final step that happens five weeks later. Remove decorations before lights, coil lights loosely around a piece of card rather than into a ball, vacuum the tree lightly before boxing it, and store it somewhere dry and off the floor.
Done properly, next December starts with a tree in good condition and lights that work, which is a considerably better beginning than most of us manage.